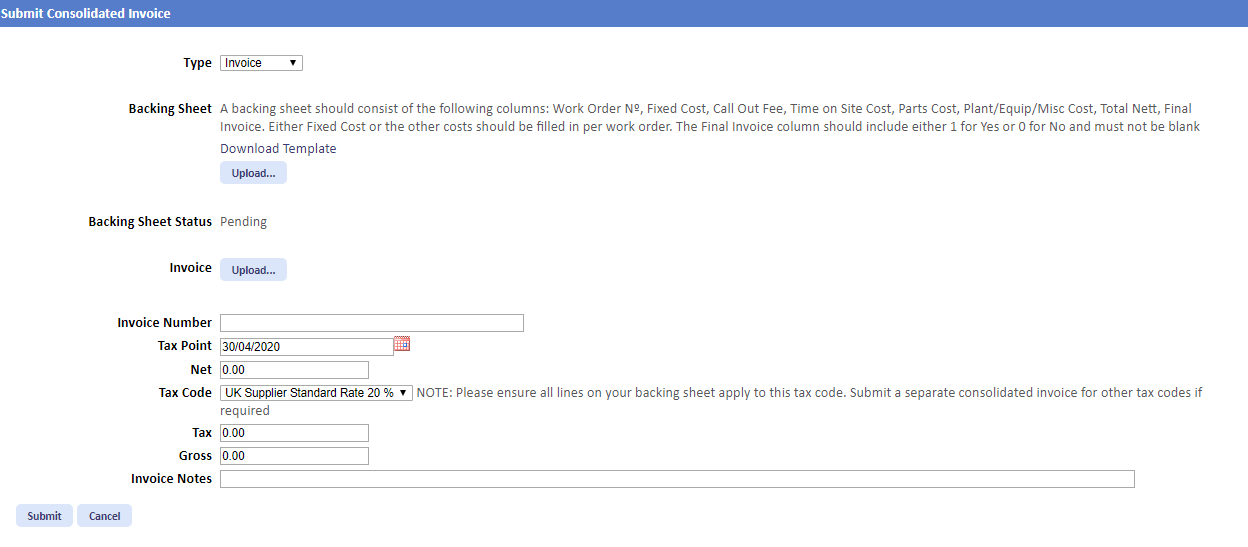
There may be instances where the User has to upload an Invoice that relates to multiple Jobs. This can be done using the Submit Consolidated Invoice function. To submit a Consolidated Invoice, click the Invoices tab and select the "Submit Consolidated Invoice” option.
Upon clicking the "Submit Consolidated Invoice" option, the Submit Consolidated Invoice screen is displayed. The screen is similar to the other Submit Invoice screen except the Type of Invoice is automatically selected and the screen is set up in two different sections: Backing Sheet and Invoice. The Backing Sheet section is displayed first as this allows the User to validate all their Work Orders have the approvable values against them before uploading the Invoice file. This section requires a Excel Worksheet containing all the Work Orders along with the columns "Work Order No" , "Fixed Cost", "Call Out Fee ", "Time On Site Cost", " Parts Cost", "Plant/Equip/Misc Cost", "Total Net" and "Final Invoice" that need to be filled in prior to uploading the file. Once ready, clicking the "Upload..." button will display the Upload File screen which requires the entry of a Name, Type which defaults to "Worksheet", and the file that needs to be uploaded. Once the document has been selected, click "Upload" to upload the document.
Note: The "Final Invoice" column works a bit differently to the rest of the columns in that either 1 or 0 needs to be specified against each line in the backing sheet. Entering 1 states that this is the Final Invoice for the Work Order whereas entering 0 will specify that this is not the Final Invoice for this Work Order.
Once the relevant document has been uploaded, the Backing Sheet Status field is populated with the status of the Backing Sheet. This can say one of three things: - Pending - This means a file hasn't been uploaded yet - Uploaded - Errors Found - This means the file was uploaded however there are errors in the file that need to be resolved before it can be submitted - Uploaded - No Errors Found - This means the file has been uploaded without error and can be submitted
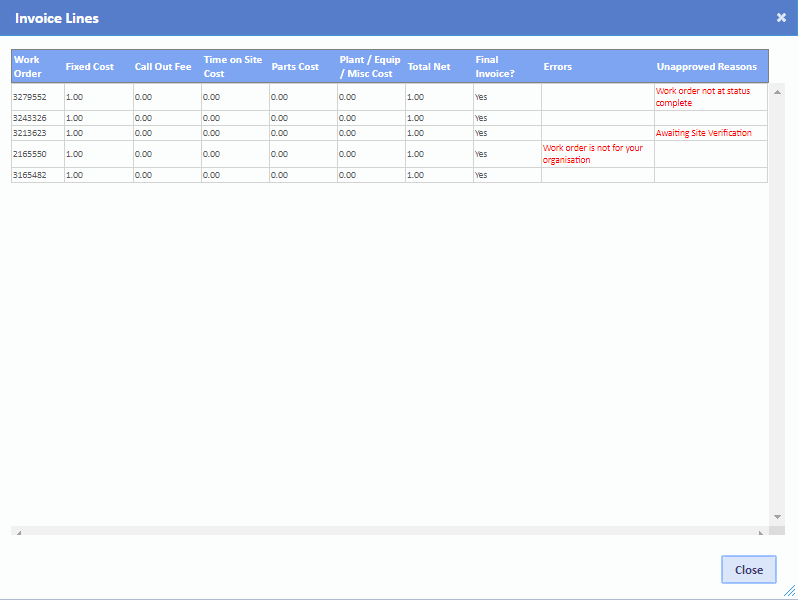
If there are errors found, then two buttons become available: "View On Screen" and "Export Individual Lines to Excel". These are explained below.
After the Backing Sheet has been successfully added, the rest of the Consolidated Invoice details need to be entered. These include uploading the Invoice file and entering the Invoice Number, the Tax Point and the Grand Total of the Invoice. Adding the Invoice file works in the same way as adding the Backing Sheet. Once all these details have been entered, click the "Submit" button to submit the Consolidated Invoice.
Note: Once a document has been added, a table appears to show the document and the types of documents that have been added. Next to each document is the button "Remove". "Remove" deletes the document uploaded.
Note:Validation rules apply to the a number fields on this screen and the uploaded spreadsheet. If the sheet contains issues, the system will warn the User with a message explaining that one or more lines on the backing sheet which will stop the upload. An example of how the errors are displayed is as follows:
Note: If the backing sheet contains the same Work Order more than once, the system will flag this to the User not only in the Invoice Lines screen but also on the main submission screen.
As a Consolidated Invoice is for multiple jobs, the User may need to check the uploaded file to resolve the errors. This can be done by the use of two buttons: "View On Screen" and "Export Individual Lines to Excel". The "View On Screen" button displays the Invoice Lines screen. This shows each line on the spreadsheet where an error has occurred or an Unapproved Reason is present. This only shows the errors that occurred and the amendments needed cannot be made here. The User can either change the existing file and upload it again or use the "Export Individual Lines to Excel" button.
The "Export Individual Lines to Excel" button exports the lines and the errors to an Excel spreadsheet. Here the User can view each line of data and the errors present and amend the file as needed. The User can save the file and even upload the newly amended in file in place of the original file.
The unapproved reasons that may occur during the Invoice upload process are as follows: - Rates Query - Attendance Cost Query - Cost of Time on Site Query - Total Cost Query - Parts/Misc Cost Query - Comprehensive Contract - Work Order not at status Complete - No Closed Attendance - No Further Invoices expected - Call-out fee Query - Asset in under Warranty - Cost exceeds Contract agreement - Invoice varies to the pre-agreed cost - Awaiting Certificate(s) - Awaiting RFI - Awaiting Meter Reading(s) - Same day visit - not expecting attendance cost
Some of the Errors that can occur are: - Work order duplicate - Work order is not for your organisation
Note: It is possible to have variance set against the system when uploading Invoices/Credit Notes. A variance is used to allow the system to accept Invoices submitted by the Resource that are a set amount over the total cost of the Job. For example, if a variance of 5% or £10 is set then the Cost values can only be over by 5% or £10. This variance is set in the back end and is not on by default please contact the System administrator to request a change.
After the Invoice/Credit Note is submitted, it will appear in the Unapproved Electronic Invoices screen along with any other Invoices/Credit Notes that the User has submitted and are currently awaiting review.
To submit further Invoices/Credit Notes, either click the "Submit Invoice" option under the Invoices tab or click the "Submit Invoice..." button that appears under the Actions menu.